
Forget the colossal, intimidating holiday pie that requires a degree in structural engineering and three hours of strategic crying. We are skipping straight to the best part: the perfect, sweet, and flaky filling contained in a gorgeous, portable package.
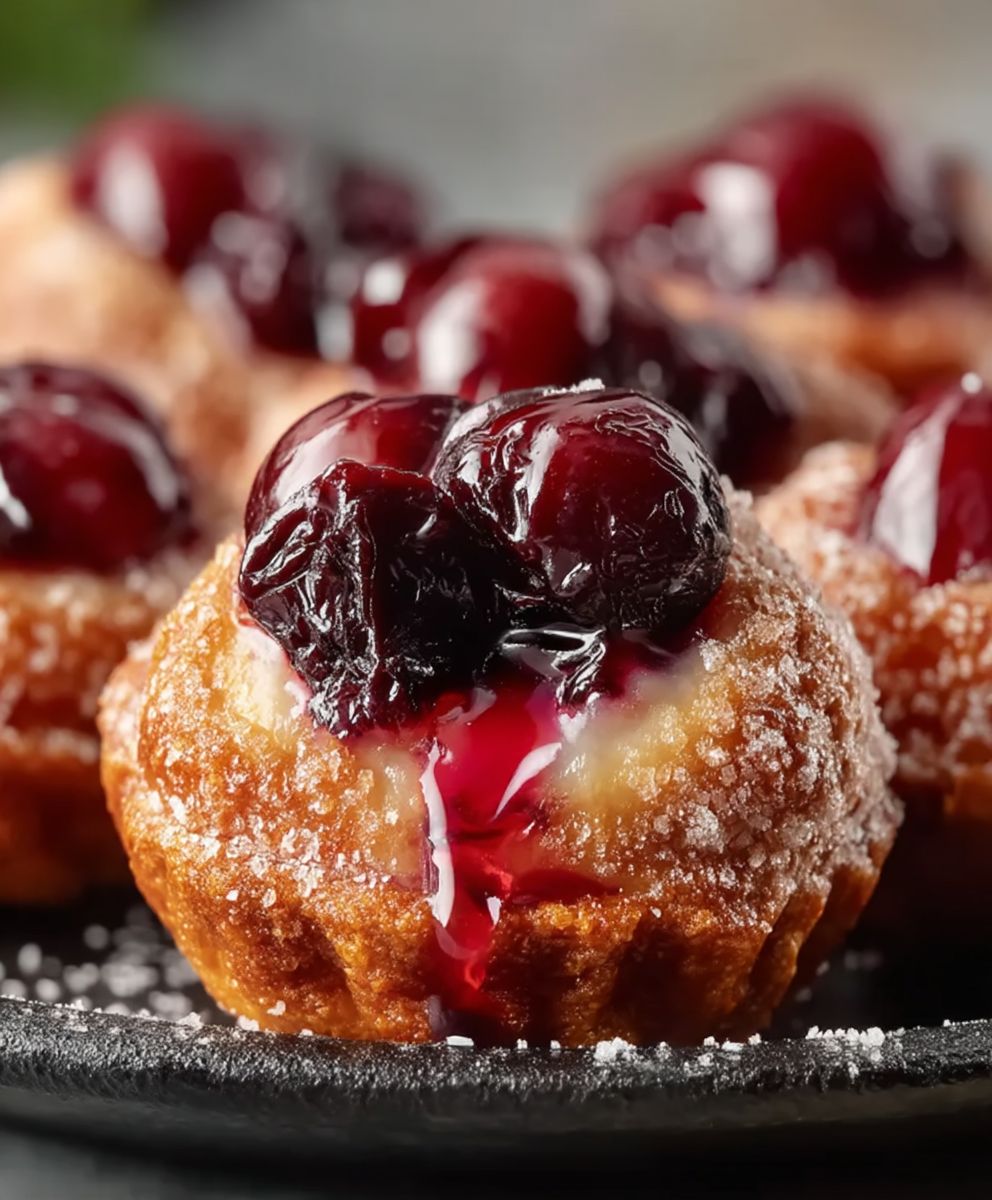
These delightful, two-bite treats are the ultimate solution for stress-free entertaining, allowing you to master the art of dessert without needing a pastry chef certification. IntroducingCherry Pie Bites: Delicious Mini Desserts for Every Occasion.
- These desserts simplify festive baking by eliminating complicated lattice work and reducing the total kitchen chaos significantly.
- Enjoy the vibrant, sweet-tart burst of real cherry filling complemented by a golden, buttery, and incredibly flaky pre-made crust.
- The appealing small size ensures beautiful presentation, making them ideal for picnics, backyard gatherings, or spontaneous sweet cravings.
- Their portability means zero slicing stress, offering a perfect, mess-free serving size straight from the cooling rack to the happy guest.
The Case Against Full-Sized Pie
There is a certain theatrical romance to presenting a massive, beautifully crimped whole pie, but that romance usually evaporates the moment you try to slice it. The structural integrity fails, the filling oozes dramatically onto the counter, and suddenly, you have transitioned from a culinary artist to a high-pressure cleanup crew. For years, I attempted to wrestle traditional pie dough into submission, ending most attempts smelling faintly of butter and despair. I needed a simpler path, a way to deliver that iconic flavor without the architectural nightmare.
The solution arrived during a particularly disastrous potluck where my lattice crust decided to stage a dramatic collapse halfway through the car ride. I realized that people don’t just want pie; they want the *essence* of pie—the rich fruit, the perfect crunch, and most importantly, they want it served to them without a spatula and a shrug of apology. Mini desserts solve this problem elegantly. They are inherently joyful, perfectly proportioned, and require zero heavy lifting after baking. They are also incredibly versatile; you can dress them up with a dusting of sugar for a formal dinner or eat them straight off the cooling rack while standing over the sink at 2 AM.
Why These Cherry Pie Bites are Superior
When you shift your perspective from “pie” to “bite,” the stress instantly melts away. We are utilizing the sheer genius of store-bought refrigerated pie dough. Yes, I said it. We are not sacrificing flavor; we are prioritizing sanity. The beauty of theseCherry Pie Bites: Delicious Mini Desserts for Every Occasionlies in their ratio: maximum filling, maximum flaky crust, minimum surface area for potential structural failure. The tartness of the cherry filling cuts beautifully through the richness of the pastry, making them dangerously addictive. You might think one is enough, but trust me, these treats activate the “just one more” reflex instantly.
This recipe is designed for the modern baker: someone who appreciates quality ingredients but recognizes that time is a precious commodity often better spent entertaining guests or, frankly, watching television. We are using standard muffin tins, a simple cherry filling, and just a touch of patience while they cool. This approach guarantees that you spend less time battling dough and more time accepting compliments. Plus, they look so impressive lined up on a platter; your guests will assume you spent the entire weekend kneading and chilling.
Ingredients for Cherry Pie Bites: Delicious Mini Desserts for Every Occasion
Here’s what you’ll need to make this delicious dish:
- Refrigerated Pie Crust DoughPurchase two packages. Using store-bought dough saves valuable time and ensures a perfectly consistent, flaky base every single time.
- Canned Tart Cherry Pie FillingUse a high-quality canned filling to provide that rich, sweet-tart cherry flavor without the fuss of pitting fresh fruit.
- Granulated SugarA small amount is needed for dusting the outside of the crust before baking to add texture and a satisfying caramelized crunch.
- Lemon Juice or Apple Cider VinegarA tiny splash brightens the flavor of the cherry filling, preventing it from tasting overly sweet or flat.
- Cornstarch or Tapioca StarchNecessary to thicken any excess liquid from the filling, ensuring the pie bites hold their perfect structure and do not become soggy.
- Large EggWhisked lightly to create an egg wash, which is essential for achieving that desirable golden-brown, glossy finish on the pastry.
- A Pinch of Cinnamon (Optional)This aromatic spice adds warmth and depth to the cherry filling, complementing the fruit perfectly without overpowering it.
The full ingredients list, including measurements, is provided in the recipe card directly below.
How to Make Cherry Pie Bites: Delicious Mini Desserts for Every Occasion
Follow these simple steps to prepare this delicious dish:
Step 1: Prep the Filling and Preheat the Oven
Preheat your oven to 375°F (190°C). Lightly spray a standard 12-cup muffin tin with nonstick cooking spray. In a medium bowl, combine the canned cherry pie filling with the cornstarch and lemon juice. Stir gently until the starch is fully dissolved and coats the cherries evenly. The cornstarch is crucial here; it acts as our binding agent, ensuring the filling stays delightfully jammy, not runny.
Step 2: Cutting and Shaping the Dough Bases
Unroll the refrigerated pie crusts onto a lightly floured surface. Using a large 3.5 to 4-inch round cookie cutter, or even a glass rim of a similar size, cut 12 circles from the dough. Reroll the scraps once to get the remaining circles. Gently press each dough circle into the bottom and up the sides of the prepared muffin cups. Ensure the dough is snug against the tin to form a solid base for the filling.
Step 3: Filling and Sealing the Pie Bites
Spoon approximately 1.5 tablespoons of the cherry filling mixture into the center of each dough-lined cup. You want the filling level to be just slightly below the rim of the crust. Now, take the remaining pie crust dough and cut out decorative tops. You can use a smaller cutter, a fun shape like a star, or simply cut small vents into the remaining dough rounds before placing them gently over the filling, sealing the edges if possible, but don’t stress over perfect crimping.
Step 4: Egg Wash and Baking for Perfect Color
In a very small bowl, whisk the egg with one teaspoon of water to create the egg wash. Brush the tops of the unbaked cherry pie bites with the egg wash; this step is key to achieving that beautiful golden sheen. Sprinkle the tops lightly with granulated sugar for added crunch and sparkle. Bake the mini desserts for 18 to 22 minutes, or until the crust is deeply golden brown and the cherry filling is bubbling slightly. The smell alone will tell you they are ready.
Step 5: Cooling is Non-Negotiable
Once baked, immediately transfer the muffin tin to a wire rack. Here is the absolute hardest part of the entire recipe: you must let the pie bites cool in the tin for at least 15 minutes. If you try to remove them while hot, the filling will be too molten and the pastry too delicate, resulting in a delightful but messy crumble. After 15 minutes, carefully lift the mini desserts out of the tin and place them directly onto the wire rack to cool completely before serving. This cooling time allows the cornstarch to fully set the filling.
Tips for Achieving Maximum Flakiness
The secret to perfect, bite-sized pastry often comes down to temperature control. Pie crust dough is fundamentally an emulsion of flour and cold fat, and keeping that fat chilled prevents it from melting into the flour too soon, ensuring those gorgeous, flaky layers develop in the oven. Even though we are using store-bought dough, treating it gently and keeping it cold is paramount to success. If your kitchen is particularly warm, consider placing the cut-out dough rounds back into the refrigerator for ten minutes before placing them in the muffin tin.
Troubleshooting Common Mini Pie Issues
One common pitfall when making small tarts is the risk of the edges burning before the center is cooked through, especially in the tight confines of a muffin tin. If you notice the edges browning too quickly during baking, simply cover the tin loosely with a piece of aluminum foil for the last five to seven minutes. Furthermore, if your filling seems too thin after cooling, next time add an extra half teaspoon of cornstarch to the mixture. Remember that while these treats are small, the flavor delivery is huge, so focusing on the crispness of the crust and the vibrancy of the fruit is always the priority. These little tarts are also incredibly flexible; feel free to substitute the cherry filling with other fruit preserves, such as blueberry or mixed berry, adjusting the cornstarch slightly to account for the liquid content of the preserve.
Storage and Serving Suggestions
These mini desserts are ideal for making ahead. Once completely cooled, you can storeCherry Pie Bites: Delicious Mini Desserts for Every Occasionin an airtight container at room temperature for up to three days, though honestly, they rarely last past the first evening. If you want to store them longer, they freeze beautifully for up to three months. Just ensure they are wrapped tightly before freezing. To serve, a light dusting of powdered sugar adds an elegant finish, or for extra decadence, serve them alongside a small scoop of vanilla bean ice cream or a dollop of fresh whipped cream.
The beauty of the pie bite format is that it transforms a cumbersome classic into a casual, grab-and-go delight. They transition effortlessly from a sophisticated tea party sweet to the perfect road trip snack. Transfer to plates and drizzle with a light glaze or dust with powdered sugar for the perfect finishing touch.
The Accidental Discovery of Sunshine on a Plate

I stumbled upon the concept ofCherry Pie Bites: Delicious Mini Desserts for Every Occasionpurely by accident during a disastrous attempt at a lattice-top pie. The crust collapsed, but the filling tasted divine! I salvaged the endeavor by using a muffin tin, realizing that miniature portions eliminated the chaos and maximized the joy.
Let’s be honest about pie. It is the dessert world’s most beautiful liar. It promises comfort but delivers a cascade of structural failure when you try to slice it. For years, I avoided baking pies entirely, opting instead for cookies or brownies—anything that stayed firmly intact upon serving. Then came the fateful cherry filling catastrophe, which proved that sometimes, failure is simply innovation dressed in a sticky glaze. The solution was surprisingly simple: shrink the pie down to a perfect, two-bite package. These bites are the quintessential example of less is more, providing all the satisfying chew of a flaky crust and the burst of sweet cherry without the messy commitment of a full nine-inch dessert.
The Case Against Full-Sized Pie
The traditional pie is a battlefield. You spend hours blind-baking, lattice-weaving, and then someone inevitably asks for the center slice, resulting in total structural collapse. This is precisely why these magnificent little morsels ride in on a white horse, saving dessert time from sticky disasters. These mini treats offer all the comforting nostalgia of grandmother’s classic pie but sized perfectly for immediate, mess-free consumption. They are designed to be popped straight into your mouth, eliminating the need for plates, forks, and therapy sessions dedicated to crust maintenance.
Essential Equipment for Mini Pie Mastery
You do not need a culinary degree or a walk-in bakery to create these delights. The magic happens primarily in a standard 12-cup muffin tin. If you want truly flaky, perfect sides, consider using a non-stick tin; perhaps the one you bought during a questionable Amazon sale three years ago that is now collecting dust. Ensure you have a rolling pin and a cookie cutter—a standard round cutter, about three inches in diameter, works perfectly for the crust bottoms. A small pastry brush will also be invaluable for applying the egg wash, which is our secret weapon for golden, glossy tops. We are keeping this process delightfully simple because life is far too short for complicated baking tools.
Ingredients That Bring the Zing
The success of theCherry Pie Biteslies in the quality and simplicity of the components. We are focusing on maximizing robust flavor with minimal fuss. For the crust, do yourself a favor and buy refrigerated pastry dough. It cuts down the stress significantly and provides reliably uniform results. For the filling, using high-quality canned or frozen dark sweet cherries (thawed and drained well) ensures a consistent texture without the tedious, stain-inducing task of pitting dozens of fresh cherries.
For the Flaky Crust:
- 2 boxes (14.1 ounces each) refrigerated pie crusts, thawed
- 1 large egg, lightly beaten (for egg wash)
- 1 tablespoon turbinado sugar (for sprinkling)
For the Cherry Filling:
- 3 cups fresh or frozen dark sweet cherries, pitted (or canned, drained well)
- 1/2 cup granulated sugar
- 1/4 cup cornstarch or tapioca starch (our thickening hero)
- 1 teaspoon vanilla powder
- 1/2 teaspoon ground cinnamon
- 1 tablespoon fresh lemon juice (for brightness and balance)
Step-by-Step Guide to Bite-Sized Bliss
Preheat your oven to 375°F (190°C). Lightly grease all twelve cups of your muffin tin. This recipe works best if you prepare the filling while the crusts are still refrigerator-cold; maintaining that chill is crucial for buttery flakiness. The secret to perfect results is ensuring the filling does not leak out, which requires a properly sealed crust base. Now, let’s get baking!
Crafting the Perfect Shells
Unroll one pie crust onto a lightly floured surface. Use your three-inch cookie cutter to cut out twelve circles. Gently press each circle into the prepared muffin tin cups, ensuring the dough reaches up the sides without tearing. Take care not to stretch the dough too much, as this encourages shrinking during baking. Repeat with the second crust until all twelve cups are lined. Gather the scraps from both crusts, briefly re-roll them, and cut out small decorative tops—maybe a star, a heart, or just a small slit for steam to escape. If you are feeling exceptionally creative, try twisting two thin strips together to make a mini braid!
Building the Flavor Core
In a medium bowl, combine the cherries, granulated sugar, cornstarch (or tapioca starch), vanilla powder, cinnamon, and lemon juice. Stir gently using a rubber spatula until the starch is fully dissolved and coats the cherries evenly. It is important not to overmix here; we want those cherries intact. Spoon the filling carefully into the crust-lined cups, filling them about two-thirds full. Remember, the filling will bubble and expand slightly as it cooks, so avoid overfilling.
The Grand Finale Baking Session
Brush the edges of the pie crusts with the egg wash. Place the decorative tops onto the filling—the egg wash acts as a perfect edible glue to seal the edges and tops. Brush the decorative tops gently with the remaining egg wash and generously sprinkle them with turbinado sugar for a lovely crunch and a professional-looking shine. Bake for 20 to 25 minutes, or until the crusts are brilliantly golden brown and the cherry filling is actively bubbling. Once they come out, you must exercise patience. Allow the bites to cool completely—ideally for at least an hour—in the muffin tin before attempting to remove them; this cooling step is absolutely vital for structural integrity.
Perfecting the Cooking Process
Start by preparing the cherry filling, letting it rest slightly while you unroll and cut the pie crusts. Press the dough into the muffin tins immediately. This sequence prevents the filling from becoming overly watery and keeps the crust cold and manageable, maximizing the flakiness when baked.
Add Your Touch
Swap cherries for a different fruit, like diced apples with nutmeg or a mixed berry blend. If you prefer a lighter sugar profile, use maple syrup instead of granulated sugar, adjusting the starch slightly. For extra depth, add a pinch of alcohol-free almond extract to the cherry filling for a sophisticated flavor boost.
Storing & Reheating
Store cooledCherry Pie Bites: Delicious Mini Desserts for Every Occasionin an airtight container at room temperature for up to three days, or refrigerate for five days. To reheat, place them in a 300°F oven for five to eight minutes until the crust is crisp again. Avoid microwaving, as it softens the perfect crust.
Expert Tips for Perfect Mini Pie Bites
-
Use tapioca starch if possible; it creates a clearer, glossier filling than cornstarch and prevents the dreaded cloudy cherry juice look.
-
If your pie crusts tear while pressing them into the muffin tin, patch them quickly using a small piece of scrap dough and a touch of egg wash as glue.
-
Ensure the cherries are thoroughly drained before mixing the filling, especially if using frozen fruit, as excess moisture leads to a soggy bottom crust.
The first time I served these, my neighbor swore I bought them from a boutique bakery. They were such a hit that my entire extended family now demands them at every single gathering.
Conclusion for Cherry Pie Bites: Delicious Mini Desserts for Every Occasion
These magnificent tiny treats truly live up to their name. They completely conquer the complexities of baking a full-sized pie, delivering intense flavor and fun in a convenient, handheld format. Whether you are hosting an elegant dinner party or simply seeking a satisfying sweet snack for Tuesday afternoon, theseCherry Pie Bitesare guaranteed crowd-pleasers. Mastering them requires only a few key techniques: keeping the crust cold, draining the fruit properly, and resisting the urge to remove them from the tin prematurely. Embrace the ease and watch as these vibrant, flaky, and intensely fruity morsels become the undisputed star of your dessert table.

Leave a Comment