
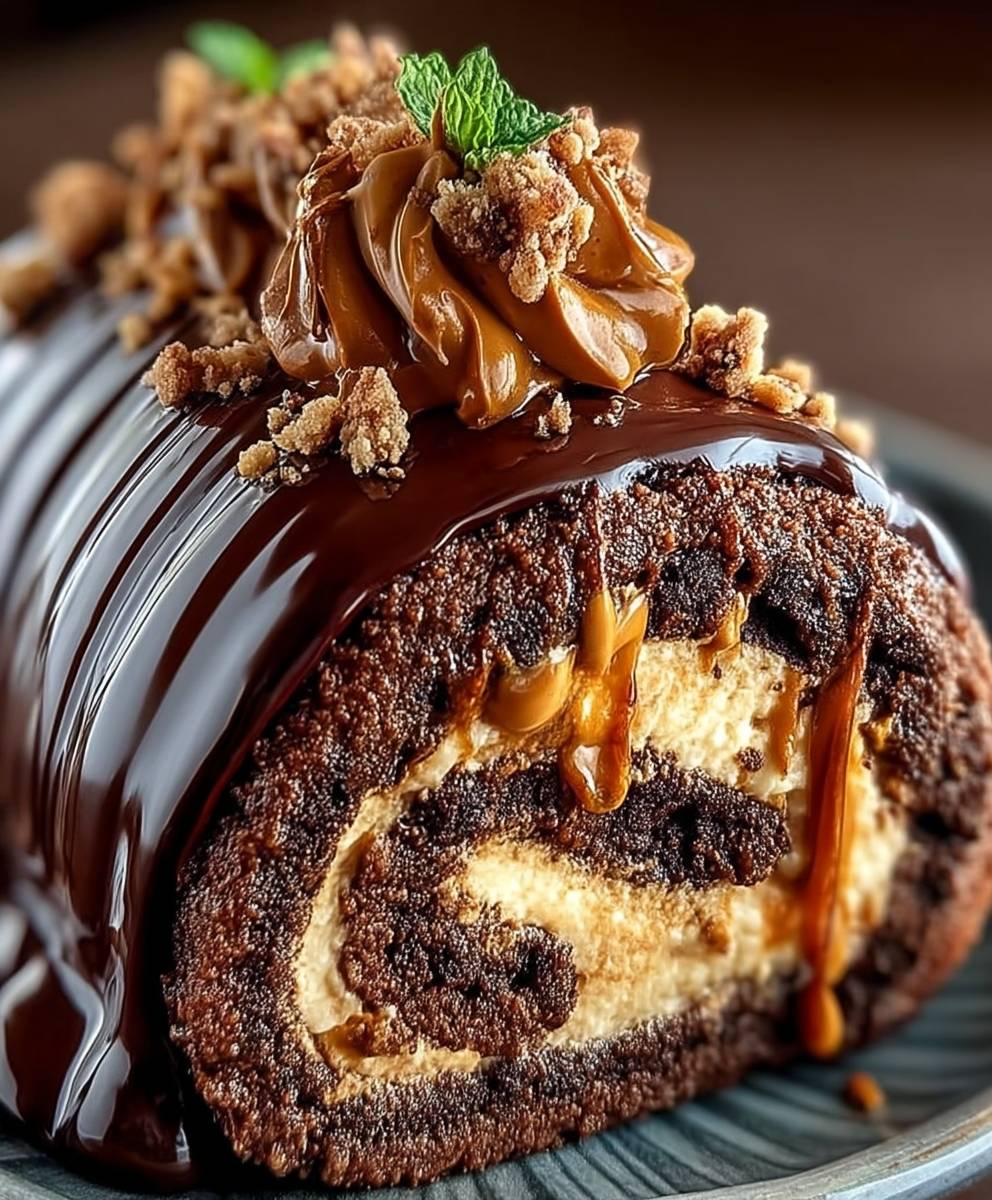
The scent of deep cocoa mixed with creamy, salty peanut butter is the true definition of dessert magic. If you are ready for a show-stopping confection that screams “I love you” in sugar, then prepare yourself for the ultimate indulgence:Peanut Butter Cup Chocolate Roll: A Decadent Dessert Recipe. This swirled masterpiece is so stunning, it requires a standing ovation after the first bite, and frankly, it is easier to master than you might think.
Forget those fussy layer cakes and complex pastries; this roll delivers all the drama without the stress. We are talking about a velvety chocolate sponge cake embracing a light, whipped peanut butter filling, creating a magnificent spiral that is pure decadence. Get ready to impress everyone at your next gathering.
- This recipe offers a perfect balance of salty and sweet, combining rich dark chocolate with smooth, slightly savory peanut butter filling for maximum flavor impact.
- The chocolate sponge cake base is surprisingly straightforward to prepare, providing a light, airy canvas that is ideal for rolling without cracking or tearing.
- Visually stunning, the elegant spiral of the roll makes it look like it came straight from a professional bakery, yet it relies on simple kitchen techniques.
- It is highly versatile for entertaining, as it can be prepared a day ahead, chilled, and then sliced just before serving for effortless presentation.
Ingredients for Peanut Butter Cup Chocolate Roll: A Decadent Dessert Recipe
Here’s what you’ll need to make this delicious dish:
- All-Purpose FlourUse bleached flour measured correctly by spooning it into the measuring cup and leveling it off; this ensures the cake remains light and tender.
- Unsweetened Cocoa PowderOpt for high-quality, dark cocoa powder (Dutch-processed is preferred) for the richest, most intense chocolate flavor in the sponge.
- Baking Powder and Baking SodaThese leavening agents work together to give the cake its necessary lift and airy structure, preventing it from becoming dense.
- EggsYou need large eggs, separated into yolks and whites; whipping the whites separately helps incorporate maximum air for a fluffy cake.
- Granulated SugarUsed both in the cake batter and the whipped egg whites, sugar stabilizes the foam and provides sweetness and moisture.
- Vanilla PowderA splash of pure vanilla powder enhances the overall sweetness and complements the robust chocolate notes beautifully.
- Powdered SugarEssential for dusting the towel before rolling and for mixing into the peanut butter filling to achieve a silky smooth texture.
- Creamy Peanut ButterChoose a reliable brand of creamy, shelf-stable peanut butter (not natural style) as its consistency is crucial for the filling structure.
- Cream CheeseFull-fat, softened cream cheese provides the necessary tang and richness to the filling, balancing the sweetness of the peanut butter.
- Heavy Whipping CreamUsed in the filling, this cream is whipped until stiff peaks form, ensuring the peanut butter layer remains light and airy, not heavy or dense.
The full ingredients list, including measurements, is provided in the recipe card directly below.
How to Make Peanut Butter Cup Chocolate Roll: A Decadent Dessert Recipe
Follow these simple steps to prepare this delicious dish:
Step 1: Preparing the Chocolate Sponge Cake Batter
Preheat your oven to 375°F (190°C). Grease a 15×10-inch jelly roll pan, line it with parchment paper, and grease the parchment paper as well—this double protection is your insurance policy against sticking. Sift together the flour, cocoa powder, baking powder, baking soda, and a pinch of salt in a medium bowl; set this dry mixture aside. In a separate large bowl, beat the egg yolks with sugar and vanilla until they are pale and thick.
Step 2: Whipping the Meringue and Folding
In a clean, dry bowl, whip the egg whites until stiff, glossy peaks form—this is the structural genius of the cake, providing airiness. Gently fold the dry ingredients into the egg yolk mixture until just combined, being careful not to overmix. Now, carefully fold the stiff egg whites into the chocolate batter in three additions, again folding slowly until no white streaks remain. Pour the batter into the prepared pan and spread it evenly to the edges.
Step 3: Baking and the Crucial Roll
Bake the sponge cake for 12 to 15 minutes, or until the cake springs back lightly when touched. While the cake bakes, lay a clean kitchen towel flat on your counter and dust it generously with powdered sugar—do not skip this step! Immediately invert the hot cake onto the powdered sugar towel, peel off the parchment paper, and trim any crisp edges. Starting from the short end, tightly roll the cake and the towel together. Allow the rolled cake to cool completely on a wire rack for at least one hour; this cooling step sets the “memory” of the roll shape, preventing cracking later.
Step 4: Creating the Peanut Butter Filling
While the cake cools, prepare the decadent peanut butter filling. In a large bowl, beat the softened cream cheese until smooth. Add the creamy peanut butter, powdered sugar, and a touch of vanilla powder, beating until fully combined and light. In a separate bowl, whip the heavy cream until soft peaks form, then gently fold the whipped cream into the peanut butter mixture until it is airy and uniform. Resist the urge to eat the entire bowl of filling with a spoon.
Step 5: Unrolling, Filling, and Final Rolling
Carefully unroll the cooled chocolate cake. Spread the peanut butter filling evenly over the surface, leaving about a one-inch border on all sides. Reroll the cake tightly, this time without the towel, using the filling to help bind the layers. Wrap the finishedPeanut Butter Cup Chocolate Roll: A Decadent Dessert Recipetightly in plastic wrap and chill for at least two hours (or ideally overnight) to allow it to set firmly.
Transfer to plates and drizzle with a melted chocolate ganache or dust with extra powdered sugar for the perfect finishing touch. Serving chilled ensures clean, beautiful slices.
The Art of the Perfect Roll: Tips and Troubleshooting
I remember the first time I attempted a rolled cake; it looked less like a delicate swirl and more like a tectonic plate shift. It cracked down the middle with the dramatic flair of a villain’s death scene in a bad movie. Mastering the roll takes patience, but mostly, it requires attention to three critical details: timing, temperature, and technique. If you are aiming for that magazine-cover-worthy spiral, these pointers will save you from kitchen meltdowns and ensure your decadent chocolate roll is a smashing success.
Achieving Flexibility: Why Timing is Everything
The single most important factor in preventing cracks is rolling the cake while it is still hot. When the cake first comes out of the oven, it is supple and pliable, ready to bend to your will. If you wait even ten minutes, the cake’s structure begins to firm up as moisture evaporates, turning it brittle. That crucial moment when you invert the cake onto the sugared towel and immediately roll it up is non-negotiable. Don’t wait for it to cool before the initial roll; the cooling process happens *while* it is rolled in the towel, setting the necessary curved shape.
The Magic of the Sugared Towel Method
Dusting the kitchen towel (ensure it is lint-free, please, nobody wants fabric fibers in their dessert) with powdered sugar serves two essential purposes. First, the sugar prevents the hot, sticky cake surface from adhering to the towel. Second, the powdered sugar adds a delicate sweetness that enhances the flavor of the final product. When you unroll the cooled cake, you will find it easily releases, ready for the peanut butter filling. If you struggle with the towel method, some bakers opt to use a large sheet of parchment paper dusted with powdered sugar instead, which provides a slightly firmer rolling surface.
Troubleshooting the dreaded Cracks
If your cake cracks upon unrolling, don’t panic! This usually happens if the cake overbaked, making it dry, or if it was not rolled quickly enough while hot. While a minor crack can often be hidden by the filling and frosting, deep fissures require a quick fix. If you notice a crack forming during the final roll, try rolling it a little less tightly, or use the peanut butter filling itself as structural glue, pressing it gently into the crack before chilling. Remember, presentation is key, but flavor is paramount; a slightly flawed roll still tastes incredible.
Flavor Variations and Presentation Ideas
While the classic peanut butter cup combination is eternally satisfying, sometimes a dessert needs a little twist to keep things exciting. This base recipe for the chocolate sponge is incredibly versatile, allowing you to swap out or enhance the filling components to create entirely new flavor profiles. Experimenting with fillings keeps this decadent dessert recipe fresh and tailored to any occasion or preference.
Filling Substitutions for the Decadent Dessert Recipe
If you want to move away from the peanut butter focus, consider swapping the main flavor of the filling while keeping the cream cheese and whipped cream base. A toasted coconut filling, made by incorporating finely shredded coconut and coconut extract, offers a tropical twist. Alternatively, a coffee caramel swirl, using strong espresso powder and a ribbon of homemade caramel sauce mixed into the cream cheese, results in a rich mocha experience. For a fruity alternative, substitute the peanut butter with strained raspberry jam and a small amount of lemon zest; the tanginess cuts through the chocolate perfectly.
Garnishes to Elevate the Peanut Butter Cup Chocolate Roll
The visual appeal of the finished roll is just as important as the taste. Once chilled, consider topping your roll with a simple chocolate glaze—a mixture of melted chocolate and heavy cream. For added texture and flavor reflecting the key ingredients, sprinkle miniature peanut butter cups (or chopped roasted peanuts) along the top. If you prefer a cleaner look, a generous dusting of powdered sugar or cocoa powder always looks elegant. Another beautiful option is to pipe small rosettes of leftover whipped cream along the edges of the roll before serving.
Storage, Serving, and Pairings
The beauty of thePeanut Butter Cup Chocolate Roll: A Decadent Dessert Recipelies in its structure; it holds up magnificently in the refrigerator, making it the perfect make-ahead option for hosting. Nobody wants to be stressing over dessert while guests are ringing the doorbell, and this roll provides the gift of time. Proper storage ensures the cake remains moist and the filling stays firm and fresh for days.
Optimal Storage Practices
Because this roll contains a cream cheese and whipped cream filling, it absolutely must be stored in the refrigerator. Once chilled and set, the best way to store the roll is to keep it tightly wrapped in plastic wrap or placed in an airtight container. Stored correctly, the cake maintains its quality for up to four days. If you need to store it longer, you can freeze the entire roll (un-garnished) for up to one month. To thaw, simply move it to the refrigerator overnight, then slice and decorate just before serving. Avoid leaving sliced pieces out at room temperature for extended periods.
Tips for Cutting and Presentation
For the cleanest, most professional slices, always use a long, sharp knife. The secret to perfect spirals is chilling; a warm roll will squash and smear. Before cutting each slice, run the knife under very hot water and wipe it completely dry. This warming action helps the knife slide smoothly through the dense chocolate and creamy filling without dragging. Cut slices about 3/4-inch thick for a substantial, elegant portion. When arranging, placing the slices cut-side up showcases the beautiful spiral.
Perfect Pairings for Maximum Enjoyment
This intensely flavored, decadent dessert recipe pairs wonderfully with beverages that can cut through its richness. A strong, dark-roast coffee, perhaps an Americano or espresso, provides the perfect bitter contrast to the sweet peanut butter and chocolate. For non-coffee drinkers, a cold glass of milk (as classic as peanut butter itself) or a rich, unflavored herbal tea makes an excellent companion. If serving for a formal gathering, consider a small scoop of high-quality vanilla bean ice cream served alongside each slice to add a refreshing, creamy element.
With these tips, your peanut butter cup chocolate roll will not only be a triumph of flavor but a masterpiece of structure, leaving your guests utterly impressed by your rolling prowess.
The scent of deep cocoa mixed with creamy, salty peanut butter is the true definition of dessert magic. If you are ready for a show-stopping confection that screams “I love you” in sugar, then prepare yourself for the ultimate indulgence:Peanut Butter Cup Chocolate Roll: A Decadent Dessert Recipe. This swirled masterpiece is so stunning, it requires a standing ovation after the first bite, and frankly, it is easier to master than you might think.
Forget those fussy layer cakes and complex pastries; this roll delivers all the drama without the stress. We are talking about a velvety chocolate sponge cake embracing a light, whipped peanut butter filling, creating a magnificent spiral that is pure decadence. Get ready to impress everyone at your next gathering.
- This recipe offers a perfect balance of salty and sweet, combining rich dark chocolate with smooth, slightly savory peanut butter filling for maximum flavor impact.
- The chocolate sponge cake base is surprisingly straightforward to prepare, providing a light, airy canvas that is ideal for rolling without cracking or tearing.
- Visually stunning, the elegant spiral of the roll makes it look like it came straight from a professional bakery, yet it relies on simple kitchen techniques.
- It is highly versatile for entertaining, as it can be prepared a day ahead, chilled, and then sliced just before serving for effortless presentation.
Ingredients for Peanut Butter Cup Chocolate Roll: A Decadent Dessert Recipe
Here’s what you’ll need to make this delicious dish:
- All-Purpose FlourUse bleached flour measured correctly by spooning it into the measuring cup and leveling it off; this ensures the cake remains light and tender.
- Unsweetened Cocoa PowderOpt for high-quality, dark cocoa powder (Dutch-processed is preferred) for the richest, most intense chocolate flavor in the sponge.
- Baking Powder and Baking SodaThese leavening agents work together to give the cake its necessary lift and airy structure, preventing it from becoming dense.
- EggsYou need large eggs, separated into yolks and whites; whipping the whites separately helps incorporate maximum air for a fluffy cake.
- Granulated SugarUsed both in the cake batter and the whipped egg whites, sugar stabilizes the foam and provides sweetness and moisture.
- Vanilla PowderA splash of pure vanilla powder enhances the overall sweetness and complements the robust chocolate notes beautifully.
- Powdered SugarEssential for dusting the towel before rolling and for mixing into the peanut butter filling to achieve a silky smooth texture.
- Creamy Peanut ButterChoose a reliable brand of creamy, shelf-stable peanut butter (not natural style) as its consistency is crucial for the filling structure.
- Cream CheeseFull-fat, softened cream cheese provides the necessary tang and richness to the filling, balancing the sweetness of the peanut butter.
- Heavy Whipping CreamUsed in the filling, this cream is whipped until stiff peaks form, ensuring the peanut butter layer remains light and airy, not heavy or dense.
The full ingredients list, including measurements, is provided in the recipe card directly below.
How to Make Peanut Butter Cup Chocolate Roll: A Decadent Dessert Recipe
Follow these simple steps to prepare this delicious dish:
Step 1: Preparing the Chocolate Sponge Cake Batter
Preheat your oven to 375°F (190°C). Grease a 15×10-inch jelly roll pan, line it with parchment paper, and grease the parchment paper as well—this double protection is your insurance policy against sticking. Sift together the flour, cocoa powder, baking powder, baking soda, and a pinch of salt in a medium bowl; set this dry mixture aside. In a separate large bowl, beat the egg yolks with sugar and vanilla until they are pale and thick.
Step 2: Whipping the Meringue and Folding
In a clean, dry bowl, whip the egg whites until stiff, glossy peaks form—this is the structural genius of the cake, providing airiness. Gently fold the dry ingredients into the egg yolk mixture until just combined, being careful not to overmix. Now, carefully fold the stiff egg whites into the chocolate batter in three additions, again folding slowly until no white streaks remain. Pour the batter into the prepared pan and spread it evenly to the edges.
Step 3: Baking and the Crucial Roll
Bake the sponge cake for 12 to 15 minutes, or until the cake springs back lightly when touched. While the cake bakes, lay a clean kitchen towel flat on your counter and dust it generously with powdered sugar—do not skip this step! Immediately invert the hot cake onto the powdered sugar towel, peel off the parchment paper, and trim any crisp edges. Starting from the short end, tightly roll the cake and the towel together. Allow the rolled cake to cool completely on a wire rack for at least one hour; this cooling step sets the “memory” of the roll shape, preventing cracking later.
Step 4: Creating the Peanut Butter Filling
While the cake cools, prepare the decadent peanut butter filling. In a large bowl, beat the softened cream cheese until smooth. Add the creamy peanut butter, powdered sugar, and a touch of vanilla powder, beating until fully combined and light. In a separate bowl, whip the heavy cream until soft peaks form, then gently fold the whipped cream into the peanut butter mixture until it is airy and uniform. Resist the urge to eat the entire bowl of filling with a spoon.
Step 5: Unrolling, Filling, and Final Rolling
Carefully unroll the cooled chocolate cake. Spread the peanut butter filling evenly over the surface, leaving about a one-inch border on all sides. Reroll the cake tightly, this time without the towel, using the filling to help bind the layers. Wrap the finishedPeanut Butter Cup Chocolate Roll: A Decadent Dessert Recipetightly in plastic wrap and chill for at least two hours (or ideally overnight) to allow it to set firmly.
Transfer to plates and drizzle with a melted chocolate ganache or dust with extra powdered sugar for the perfect finishing touch. Serving chilled ensures clean, beautiful slices.
The Art of the Perfect Roll: Tips and Troubleshooting
I remember the first time I attempted a rolled cake; it looked less like a delicate swirl and more like a tectonic plate shift. It cracked down the middle with the dramatic flair of a villain’s death scene in a bad movie. Mastering the roll takes patience, but mostly, it requires attention to three critical details: timing, temperature, and technique. If you are aiming for that magazine-cover-worthy spiral, these pointers will save you from kitchen meltdowns and ensure your decadent chocolate roll is a smashing success.
Achieving Flexibility: Why Timing is Everything
The single most important factor in preventing cracks is rolling the cake while it is still hot. When the cake first comes out of the oven, it is supple and pliable, ready to bend to your will. If you wait even ten minutes, the cake’s structure begins to firm up as moisture evaporates, turning it brittle. That crucial moment when you invert the cake onto the sugared towel and immediately roll it up is non-negotiable. Don’t wait for it to cool before the initial roll; the cooling process happens *while* it is rolled in the towel, setting the necessary curved shape.
The Magic of the Sugared Towel Method
Dusting the kitchen towel (ensure it is lint-free, please, nobody wants fabric fibers in their dessert) with powdered sugar serves two essential purposes. First, the sugar prevents the hot, sticky cake surface from adhering to the towel. Second, the powdered sugar adds a delicate sweetness that enhances the flavor of the final product. When you unroll the cooled cake, you will find it easily releases, ready for the peanut butter filling. If you struggle with the towel method, some bakers opt to use a large sheet of parchment paper dusted with powdered sugar instead, which provides a slightly firmer rolling surface.
Troubleshooting the Dreaded Cracks
If your cake cracks upon unrolling, don’t panic! This usually happens if the cake overbaked, making it dry, or if it was not rolled quickly enough while hot. While a minor crack can often be hidden by the filling and frosting, deep fissures require a quick fix. If you notice a crack forming during the final roll, try rolling it a little less tightly, or use the peanut butter filling itself as structural glue, pressing it gently into the crack before chilling. Remember, presentation is key, but flavor is paramount; a slightly flawed roll still tastes incredible. Proper hydration of the batter is key for flexibility, ensuring you don’t compact the flour during mixing.
Flavor Variations and Presentation Ideas
While the classic peanut butter cup combination is eternally satisfying, sometimes a dessert needs a little twist to keep things exciting. This base recipe for the chocolate sponge is incredibly versatile, allowing you to swap out or enhance the filling components to create entirely new flavor profiles. Experimenting with fillings keeps this decadent dessert recipe fresh and tailored to any occasion or preference. We sometimes forget that the chocolate roll is merely a vessel for deliciousness, and altering the interior can transform the entire experience.
Filling Substitutions for the Decadent Dessert Recipe
If you want to move away from the peanut butter focus, consider swapping the main flavor of the filling while keeping the cream cheese and whipped cream base. A toasted coconut filling, made by incorporating finely shredded coconut and coconut extract, offers a tropical twist. Alternatively, a coffee caramel swirl, using strong espresso powder and a ribbon of homemade caramel sauce mixed into the cream cheese, results in a rich mocha experience. For a fruity alternative, substitute the peanut butter with strained raspberry jam and a small amount of lemon zest; the tanginess cuts through the chocolate perfectly. You could also include chopped pieces of your favorite chocolate bar for extra crunch and intensity.
Garnishes to Elevate the Peanut Butter Cup Chocolate Roll
The visual appeal of the finished roll is just as important as the taste. Once chilled, consider topping your roll with a simple chocolate glaze—a mixture of melted chocolate and heavy cream. For added texture and flavor reflecting the key ingredients, sprinkle miniature peanut butter cups (or chopped roasted peanuts) along the top. If you prefer a cleaner look, a generous dusting of powdered sugar or cocoa powder always looks elegant. Another beautiful option is to pipe small rosettes of leftover whipped cream along the edges of the roll before serving. Remember, the presentation of yourPeanut Butter Cup Chocolate Roll: A Decadent Dessert Recipeis the final, essential step in the performance.
Storage, Serving, and Pairings
The beauty of this sweet creation lies in its structure; it holds up magnificently in the refrigerator, making it the perfect make-ahead option for hosting. Nobody wants to be stressing over dessert while guests are ringing the doorbell, and this roll provides the gift of time. Proper storage ensures the cake remains moist and the filling stays firm and fresh for days, ready to be sliced and adored whenever the craving strikes.
Optimal Storage Practices
Because this roll contains a cream cheese and whipped cream filling, it absolutely must be stored in the refrigerator. Once chilled and set, the best way to store the roll is to keep it tightly wrapped in plastic wrap or placed in an airtight container. Stored correctly, the cake maintains its quality for up to four days. If you need to store it longer, you can freeze the entire roll (un-garnished) for up to one month. To thaw, simply move it to the refrigerator overnight, then slice and decorate just before serving. Avoid leaving sliced pieces out at room temperature for extended periods, as the filling will soften too much and compromise the structural integrity.
Tips for Cutting and Presentation
For the cleanest, most professional slices, always use a long, sharp knife. The secret to perfect spirals is chilling; a warm roll will squash and smear. Before cutting each slice, run the knife under very hot water and wipe it completely dry. This warming action helps the knife slide smoothly through the dense chocolate and creamy filling without dragging. Cut slices about 3/4-inch thick for a substantial, elegant portion. When arranging, placing the slices cut-side up showcases the beautiful spiral and the contrasting layers of the chocolate cake and peanut butter filling.
Perfect Pairings for Maximum Enjoyment
This intensely flavored, decadent dessert recipe pairs wonderfully with beverages that can cut through its richness. A strong, dark-roast coffee, perhaps an Americano or espresso, provides the perfect bitter contrast to the sweet peanut butter and chocolate. For non-coffee drinkers, a cold glass of milk (as classic as peanut butter itself) or a rich, unflavored herbal tea makes an excellent companion. If serving for a formal gathering, consider a small scoop of high-quality vanilla bean ice cream served alongside each slice to add a refreshing, creamy element, creating a delightful temperature contrast.
With these tips, your peanut butter cup chocolate roll will not only be a triumph of flavor but a masterpiece of structure, leaving your guests utterly impressed by your rolling prowess and this incredible dessert recipe.
The Accidental Discovery of Sunshine on a Plate

This magnificent dessert was born during a frantic baking session where I accidentally poured a ridiculous amount of peanut butter filling into a delicate chocolate sponge. What began as a catastrophic mess quickly revealed itself as pure culinary destiny, tasting exactly like a supersized, creamy, and irresistible peanut butter cup rolled up perfectly.
Perfecting the Cooking Process
Achieving the perfect, crack-free chocolate sponge is key. Bake the sponge first, letting it cool slightly while you whip the decadent peanut butter filling. This precise timing ensures the cake is pliable enough to roll without tearing, locking in that heavenly creaminess when you chill it.
Add Your Touch
If you enjoy extra crunch, fold toasted pecans or small, crispy rice cereal into the peanut butter mousse. For a deeper flavor, swap out regular vanilla powder for a hint of espresso powder in the chocolate batter. You could also garnish the finished dessert with a drizzle of rich melted dark chocolate.
Storing & Reheating
Store leftover slices of this Peanut Butter Cup Chocolate Roll: A Decadent Dessert Recipe tightly covered in the refrigerator for up to four days. We do not recommend heating this dessert; serve it chilled or at cool room temperature for the best texture and flavor profile.
The Thrill of the Roll: Conquering Dessert Anxiety
The journey to creating the ultimate dessert roll is paved with good intentions and the occasional snapped sponge. For years, I avoided roll cakes like they were tax audits, convinced that they existed purely to humble home bakers. But once I realized the simple physics involved—heat makes the cake flexible, and a gentle towel helps it remember the shape—the fear vanished. This recipe for the Peanut Butter Cup Chocolate Roll: A Decadent Dessert Recipe eliminates all the usual stress, focusing instead on delivering maximum flavor and visual impact.
This dessert isn’t just a treat; it’s a statement. It declares that you are serious about flavor, yet playful in execution. The contrast between the mildly bittersweet cocoa sponge and the sweet, salty, and unbelievably fluffy peanut butter mousse is what makes this dessert so addictive. It’s like eating your favorite candy bar, but elevated to fine-dining status. Every bite is a delightful combination of textures, melting into a harmonious explosion of classic flavors.
We’ve all experienced that moment when a recipe looks gorgeous online but falls apart in the kitchen. I crafted this specific chocolate peanut roll recipe to be sturdy enough for everyday life. It handles the rolling process beautifully, and the resulting cake is robust enough to hold up the substantial peanut butter filling without collapsing. When you follow the steps precisely, especially the immediate post-bake roll, you set yourself up for undeniable dessert victory.
Building the Perfect Chocolate Foundation
A successful roll cake hinges entirely on the quality and flexibility of the sponge. Think of this chocolate layer as the blanket hugging the glorious peanut butter filling. It needs to be airy, full of height, but thin enough to bend without protesting. This is achieved by mastering the art of the meringue. We treat the egg whites like precious cargo, beating them until they form stiff, glossy peaks. This step incorporates the crucial volume needed to keep the cake light.
When incorporating the dry ingredients and the meringue into the egg yolk mixture, remember the rule of the gentle giant: be strong enough to mix, but soft enough not to damage the air cells. Using a sifting technique for the cocoa powder and flour ensures there are no lumps, guaranteeing a uniformly smooth texture. Lumps can weigh down the batter and lead to uneven baking, which is a prime cause of sponge cracks when rolling.
The quick bake time is essential. Because the batter is spread so thinly, it cooks fast. Ten to twelve minutes is often all you need. If you smell chocolate baking strongly throughout your house, you’ve likely gone too far! The perfect indicator is a quick press on the center of the cake; if it springs back immediately, it is ready to meet its destiny with the powdered sugar-dusted towel. If it leaves an indent, give it another minute, but watch carefully.
Recipe Card: Peanut Butter Cup Chocolate Roll: A Decadent Dessert Recipe
Ingredients for the Chocolate Sponge
- 3 large eggs, separated
- ½ cup granulated sugar, divided
- ¼ cup unsweetened cocoa powder
- ¼ cup all-purpose flour
- 1 teaspoon vanilla powder
- ½ teaspoon baking soda
- ¼ teaspoon salt
- 2 tablespoons hot water
Ingredients for the Creamy Peanut Butter Filling
- 1 cup creamy peanut butter (all-natural works well)
- 1 cup powdered sugar
- ½ cup (1 stick) unsalted butter, softened
- 1 teaspoon vanilla powder
- 2–3 tablespoons milk or heavy cream
Instructions for the Peanut Butter Cup Chocolate Roll
- Preheat your oven to 375°F (190°C). Line a 15×10 inch jelly-roll pan with parchment paper, allowing the paper to overhang the edges slightly. Lightly grease the paper.
- Prepare the Sponge Batter:In a large bowl, beat the egg yolks with ¼ cup of the granulated sugar until thick and pale yellow. Stir in the vanilla powder and hot water.
- In a separate medium bowl, whisk together the flour, cocoa powder, baking soda, and salt. Gently fold the dry ingredients into the yolk mixture until just combined.
- In a clean, dry bowl, beat the egg whites until soft peaks form. Gradually add the remaining ¼ cup of granulated sugar and continue beating until stiff, glossy peaks form.
- Fold one-third of the egg whites into the chocolate batter to lighten it, then gently fold in the remaining whites until no streaks remain. Spread the batter evenly into the prepared pan.
- Bake and Roll:Bake for 10–12 minutes, or until the cake springs back when lightly touched.
- While the cake is baking, lay a clean, lint-free kitchen towel flat and dust it lightly with powdered sugar.
- As soon as the cake is out of the oven, immediately invert it onto the prepared towel. Carefully peel off the parchment paper.
- Starting from the short end, tightly roll the cake and the towel together. Place the rolled cake seam-side down on a wire rack and allow it to cool completely (about 1 hour).
- Make the Filling:In a medium bowl, cream together the softened butter and peanut butter until smooth. Gradually beat in the powdered sugar until fully incorporated. Add the vanilla and enough milk or cream to achieve a fluffy, spreadable consistency.
- Assemble the Roll:Carefully unroll the cooled cake. Spread the creamy peanut butter filling evenly over the surface, leaving about a one-inch border around the edges.
- Re-roll the cake tightly, without the towel this time. Place the finished roll seam-side down on a serving platter.
- Refrigerate the dessert for at least 2 hours before slicing and serving. Dust with extra powdered sugar or cocoa powder before presenting this delightful Peanut Butter Cup Chocolate Roll: A Decadent Dessert Recipe.
Secrets to a Creamy, Dreamy Peanut Butter Mousse
The peanut butter filling is the star of this show, providing the rich, comforting core that contrasts beautifully with the airy chocolate sponge. The key to its success is temperature. If the butter or peanut butter is cold, you will end up with a chunky, grainy filling that doesn’t spread well and will certainly crack your cake. Everything needs to be perfectly soft—true room temperature—so it creams together into a light, airy mass.
Using powdered sugar (confectioners’ sugar) instead of granulated sugar is critical, as it dissolves immediately, creating that signature smooth, mousse-like texture. If you want a richer, almost cheesecake-like consistency, you can substitute a few ounces of softened cream cheese for an equivalent amount of the butter, which adds a pleasant tanginess that cuts through the sweetness.
Remember to add the milk or cream sparingly. You are aiming for a filling that holds a soft peak when lifted by a spoon, but that can still be spread effortlessly with an offset spatula. Too much liquid and the roll might weep or become unstable. If you accidentally add too much liquid, simply beat in a little extra powdered sugar until the ideal consistency returns.
This Peanut Butter Cup Chocolate Roll is perfect served slightly chilled, which allows the peanut butter filling to firm up just enough to maintain its perfect swirl structure when sliced. Presenting it dusted with a light layer of cocoa powder makes the dark, rich color pop, guaranteeing oohs and aahs from your delighted audience.
Expert Tips for Mastering This Chocolate Peanut Roll
-
Do not skip the powdered sugar on the rolling towel; this prevents the hot sponge from sticking and tearing when you peel off the parchment paper.
-
Ensure your egg whites form stiff peaks, as this is the primary lift for the sponge. If the whites are weak, your cake will be dense and crack easily.
-
Use room-temperature peanut butter and butter for the filling; cold ingredients will result in a grainy texture that won’t spread smoothly.
My grandmother once tried to make this for a bake sale but forgot to put the parchment paper down. The entire sponge cemented itself to the pan, resulting in a frantic call and a very messy cleanup—a disaster we still laugh about at family gatherings.
Conclusion for Peanut Butter Cup Chocolate Roll: A Decadent Dessert Recipe
The Peanut Butter Cup Chocolate Roll: A Decadent Dessert Recipe is far more than just a cake; it’s an experience. We’ve covered how to bake a flawless, flexible chocolate sponge and prepare the smooth, cloud-like peanut butter mousse that gives this roll its signature flavor. Remember that gentle handling during the folding and the crucial initial roll-up are the keys to success. Whether you are aiming to impress guests or simply indulge in a phenomenal chocolate and peanut butter pairing, this recipe provides stunning results with surprisingly manageable steps. Chill it, slice it, and prepare for pure confectionery bliss.

Leave a Comment